Profiles
Profiles are a set of general configuration settings that can be swiftly and easily applied to all devices associated with the Profile so all devices are configured identically as a group.

Creating a Profile
After a profile is created, you can configure SSID and wireless settings, set up captive portal pages, and configure other general settings within each profile, .
-
Navigate to Configure > Access Point > Profiles.
-
Click Create Profile.
-
Enter a name for the Profile and choose the device model.
Note: The Profile can only be used for the selected device model type.
-
Select Clone from exist profile and choose a Profile from the drop-down menu to clone an existing Profile. Or select to use pre-defined settings. You can modify the settings with the Edit function later.
-
Click Create Profile.
Creating an SSID
You can create multiple SSIDs under a single Profile and configure each SSID with unique settings to accommodate different wireless usage scenarios.
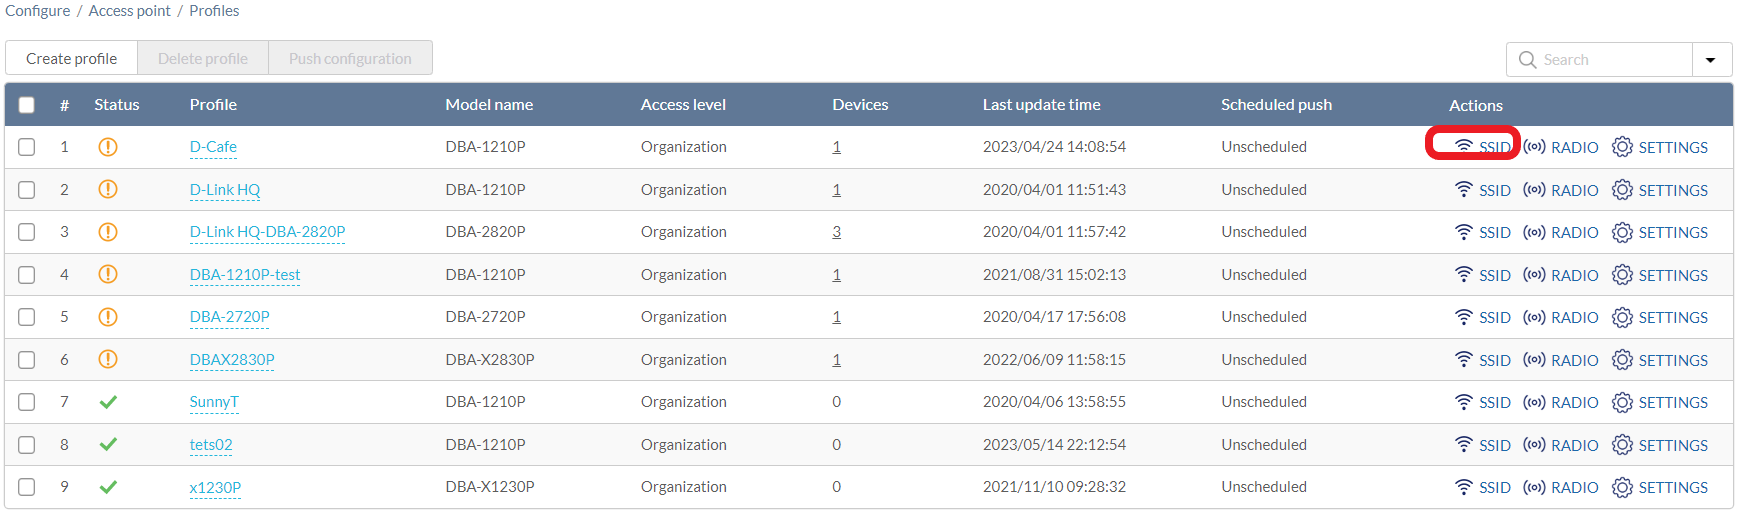
- Navigate to Configure > Access Point > Profiles.
- From the Profile list, click SSID under the Actions column of the Profile you wish to create an SSID for.
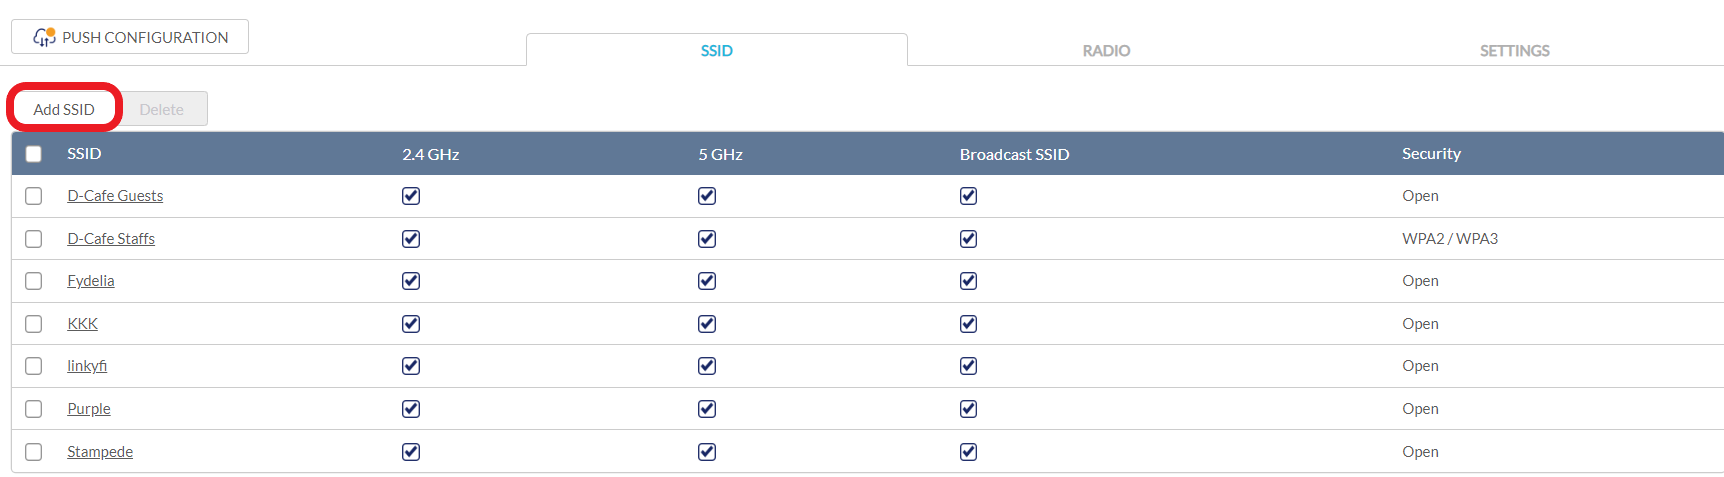
- On the SSID page, click Add SSID.
- Enter a name for the SSID and choose which wireless bands to enable.
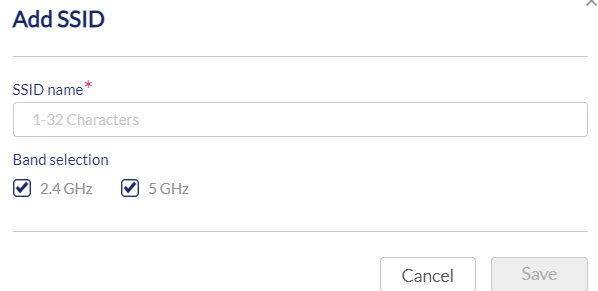
- Click Save.
- [Optional] Repeat steps 1 to 5 to create additional SSIDs.
Deleting Profiles
- Navigate to Configure > Access Point > Profiles.
- From the Profile list, click the checkbox next to the profiles you which to delete and click Delete Profile.

- When prompted to confirm, click Yes.
Configuring Basic SSID
From the basic SSID configuration section, you can configure general wireless and SSID settings, including SSID name, security mode, DHCP settings, broadcasting mode, and VLAN .
- Navigate to Configure > Access Point > Profiles.
- From the Profile list, click SSID under the Actions column of the Profile of the SSID you wish to edit.
- From the SSID list, click the SSID name of the SSID you wish to edit.
- In the SSID configuration window, click the Basic tab.
- From the Security drop-down menu, select Open, Enhanced Open, or Enhanced Open+Open, WPA2, WPA/WPA2, WPA3, or WPA2/WPA3.
Note: This Open option removes all security from the SSID and will allow all clients to associate to the SSID without requiring authentication or authorization. This is not recommended. The Enhanced Open enables better security using encryption and privacy on open networks. The Enhanced Open+Open allows both types of open networks.
Using WPA Security with PSK
For WPA2, WPA/WPA2, WPA3, or WPA2/WPA3, specify the following information if Pre-shared Key (PSK) or Simultaneous Authentication of Equals (SAE) is selected as the Auth method:
|
Encryption |
Select an encryption method. |
|
Passphrase |
Enter a pre-shared key which clients will need to enter in order to connect to the SSID. |
|
Group key update interval |
Set the interval (in seconds) at which the group key is updated for the SSID. The default is 3600 seconds. |
Using WPA Security with RADIUS Server
For WPA2, WPA/WPA2, WPA3, or WPA2/WPA3, select a Primary RADIUS server and an optional secondary server if RADIUS is selected as the Auth method. Also select the Encryption method and specify the Group Key Update Interval. If you have no pre-configured RADIUS servers, click Add a RADIUS server and specify the following information:
| Server Name | Enter the name of the RADIUS server. |
|
IP Address |
Enter the IP address of the RADIUS server. |
|
Port |
Enter a port for the RADIUS server. The range is between 1 and 65535. |
|
Secret |
Enter a shared secret. Note: Must be between 2-32 characters. |
| Authentication Method | [Optional] Select the Authentication Method. The options are PAP, MS-CHAP/MS-CHAPv2, EAP-MD5 or CHAP. |
| RADIUS Accounting | [Optional] Enable or disable the accounting mechanism. If enabled, enter the IP Address, Port number, Secret and Accounting Interim Interval in seconds. |
- Choose to enable or disable SSID broadcasting.
Note: If SSID broadcasting is disabled, users will not see the SSID when they scan for available networks on their device. - Check the wireless bands to enable. If both bands are enabled, choose to enable or disable band steering which automatically connects compatible clients to the 5 GHz band.
- Choose to enable or disable guest access mode.
Note: Enabling guest access will make this SSID an isolated guest network and will automatically enable NAT mode and station isolation. This prevents guest users from connecting to the internal network. - Choose to enable or disable Network Address Translation (NAT mode).
Note: This is enabled by default if guest access mode is enabled. - If NAT Mode is enabled, select Auto to use an automatic IP pool or select a customized 2.4 GHz and 5 GHz DHCP pool from the drop-down menu.
- [Optional] To create a customized DHCP pool, click Add a DHCP Pool and specify the following information:
|
DHCP name |
Enter a name for the DHCP pool. |
|
Lease time |
Select a duration from the drop-down menus to specify the IP lease time. When the lease time expires, the client will be assigned a new IP address from the pool. |
|
Start IP |
Enter the starting IP address of the pool. Only IP address within the start/end range will be assigned to clients. |
|
End IP |
Enter the starting IP address of the pool. Only IP address within the start/end range will be assigned to clients. |
|
Enter a valid subnet mask. |
|
|
Enter a valid gateway address. |
|
|
Primary |
Enter a primary DNS server address. |
|
Secondary |
Enter a secondary DNS server address. |
| Search Domain |
Enter the DNS search domain. |
- Choose to enable or disable VLAN.
- If VLAN is enabled, specify the following information:
Note: If the NAT mode is enabled, the VLAN settings will follow the Management VLAN setting instead. Refer to the Configuring_General_Profile_Settings section.
|
VLAN mode |
Select the VLAN type. Tagged: Adds an 802.1Q header to traffic. Untagged: Does not add a tag to traffic. |
|
VLAN tag |
Specify a VLAN tag. This will segment traffic with the respective VLAN tag. |
- Choose to enable or disable Station Isolation. This prevents clients connected to the same SSID from communicating with each other.
- Enter the NAS-ID (network access server identifier) to be sent in the RADIUS access request so that the RADIUS server can be notified and choose a policy for that request. If this is left empty, the device UID will be used instead.
- Click Save.
- Click Push Configuration.
Configuring SSID Captive Portal
Configuring an SSID Click-Through Captive Portal
A click-through captive portal page requires users to click through a splash page such as a Terms of Agree page before connecting to the SSID. This requires no additional login credentials.
- Navigate to Configure > Access Point > Profiles.
- From the Profile list, click SSID under the Actions column of the Profile of the SSID you wish to edit.
- From the SSID list, click the SSID name of the SSID you wish to edit.
- In the SSID configuration window, click the Captive Portal tab.
- Select Click-through as the Splash page type.
- Select a click-through page from the available Splash page menu.
- [Optional] Click Splash page editor. Refer to Splash Pages for more information.
- Specify the following information:
|
Session Timeout |
Enter a duration (in minutes) before the connection session automatically times out. The default is 120 minutes. |
|
Idle timeout |
Enter a duration (in minutes) of allowed inactivity before the captive portal page times out. |
| Session Limited | [Optional] Enter the maximum amount of sessions limited (unlimited, or 1-5). |
| Traffic Limited | [Optional] Specify how much data (MB/session) a client can transfer in a session. Enter 0 to disable the limitation. |
| URL Redirection | [Optional] If URL redirection is enabled, users will be redirected to the chosen URL after access to the SSID is granted. |
|
Redirection interval |
Enter the time (in minutes) clients will be periodically redirected to the URL. |
- Click Save.
- Click Push Configuration.
Configuring an SSID Captive Portal with Basic Login Page Using Local Authentication
A basic login captive portal page requires users to log in using a user account configured in local authentication databases. To create and manage local authentication databases, refer to Local Authentication for more information.
- Navigate to Configure > Access Point > Profiles.
- From the Profile list, click SSID under the Actions column of the Profile of the SSID you wish to edit.
- From the SSID list, click the SSID name of the SSID you wish to edit.
- In the SSID configuration window, click the Captive Portal tab.
- Select Sign-on with basic login page as the Splash page type.
- Select a basic login page from the drop-down menu.
- [Optional] Click Splash page editor to open the splash page editor window.
- Select Local authentication as the Basic Login Page type.
- [Optional] Choose to enable or disable simultaneous logins.
- Select a local authentication database from the drop-down menu.
Note: Local authentication databases can be configured separately. Refer to the Local Authentication section for more information. - [Optional] Click Add authentication users to create a new local authentication database. Or click Local authentication List to view the Local authentication database.
- Specify the following information:
|
Session Timeout |
Enter a duration (in minutes) before the connection session automatically times out. The default is 120 minutes. |
|
Idle timeout |
Enter a duration (in minutes) of allowed inactivity before the captive portal page times out. The default is 30 minutes. |
| Session Limited | [Optional] Enter the maximum amount of sessions limited (unlimited, or 1-5). |
| Traffic Limited | [Optional] Specify how much data (MB/session) a client can transfer in a session. Enter 0 to not restrict the data amount. |
| Walled Garden | [Optional] Add a walled garden configuration to the captive portal. |
| URL Redirection | [Optional]If URL redirection is enabled, users will be redirected to the chosen URL after access to the SSID is granted. |
- Click Save.
- Click Push Configuration.
Configuring an SSID Captive Portal with Basic Login Page Using a RADIUS or LDAP Server
- Navigate to Configure > Access Point > Profiles.
- From the Profile list, click SSID under the Actions column of the Profile of the SSID you wish to edit.
- From the SSID list, click the SSID name of the SSID you wish to edit.
- In the SSID configuration window, click the Captive Portal tab.
- Select Sign-on with basic login page as the Splash page type.
- Select a basic login page from the drop-down menu.
- [Optional] Click Splash page editor to open the splash page editor window. Refer to the Splash Pages section for more information.
- Select RADIUS or LDAP as the Basic Login Page type.
Note: Authentication servers can be configured separately. Refer to the Local Authentication section for more information.
- [Optional] If you have no pre-configured RADIUS or LDAP servers, click Add a RADIUS server or Add an LDAP server and specify the following information:
| Server Name | Enter a name for the server. |
|
IP Address |
Enter the IP address of the server. |
|
Port |
Enter a port for the server. The range is between 1 and 65535. (Default: 1812 for RADIUS server; 389 for LDAP server). |
| Base DN | Enter the domain for LDAP, for example, cn=admin, dc=mydomain, dc=local. |
| Encryption | [Optional] Select SSL or TLS or disable this option for LDAP. |
|
Secret |
Enter a shared secret for RADIUS. Note: Must be between 2-32 characters. |
| Authentication Method | [Optional] Select the Authentication Method. The options are PAP, MS-CHAP/MS-CHAPv2, EAP-MD5 or CHAP. |
| RADIUS Accounting | [Optional] Enable or disable the accounting mechanism. If enabled, enter the IP Address, Port number, Secret and Accounting Interim Interval in seconds. |
- Select a primary RADIUS or LDAP server database from the drop-down menu.
- [Optional] Select a secondary RADIUS or LDAP server database from the drop-down menu.
- Specify the following information:
| Simultaneous Login |
[Optional] Enable to allow the same account to be reused during multiple concurrent sessions. Note: Different authentication methods are unrelated regardless if using the same email or not. |
|
Session Timeout |
[Optional] Enter a duration (in minutes) before the connection session automatically times out. The default is 120 minutes. |
|
Idle timeout |
[Optional] Enter a duration (in minutes) of allowed inactivity before the captive portal page times out. |
| Session Limited | [Optional] Enter the maximum amount of sessions limited (Unlimited, or 1-5). |
| Traffic Limited | [Optional] Specify how much data (MB/session) a client can transfer in a session. Enter 0 to not restrict the data amount. |
| Walled Garden | [Optional] Add a walled garden configuration to the captive portal. |
| URL Redirection | [Optional] If URL redirection is enabled, users will be redirected to the chosen URL after access to the SSID is granted. |
|
Redirection interval |
Enter the time (in minutes) clients will be periodically redirected to the URL. |
- Click Save.
- Click Push Configuration.
Configuring an SSID Captive Portal with Third Party Login
- Navigate to Configure > Access Point > Profiles.
- From the Profile list, click SSID under the Actions column of the Profile of the SSID you wish to edit.
- From the SSID list, click the SSID name of the SSID you wish to edit.
- In the SSID configuration window, click the Captive Portal tab.
- Select Sign-on with third party credentials as the Splash page type.
- Select a Splash page from the drop-down menu.
- [Optional] Click Splash page editor to open the splash page editor window. Refer to Splash Pages for more information.
- Select the required information:
|
3rd party credentials |
Check to the box next to Facebook, Google, Weibo, Line and Twitter to enable logging in using respective account credentials. |
|
Session Timeout |
Enter a duration (in minutes) before the connection session automatically times out. The range is 2-1440 minutes. |
|
Idle timeout |
Enter a duration (in minutes) of allowed inactivity before the captive portal page times out. The range is 1-1439 minutes. |
| Simultaneous Login |
[Optional] Enable to allow the same account to reuse during multiple concurrent sessions. Note: Different authentication methods are unrelated regardless if using the same email or not. |
| Session Limited | [Optional] Enter the maximum amount of sessions limited. The range is unlimited or 1-5. |
| Traffic Limited | [Optional] Specify how much data (MB/session) a client can transfer in a session. Enter 0 to disable the limitation. |
| Walled Garden | [Optional] Add a walled garden configuration to the captive portal. |
| URL Redirection | [Optional] If URL redirection is enabled, users will be redirected to the chosen URL after access to the SSID is granted. |
|
Redirection interval |
Enter the time (in minutes) clients will be periodically redirected to the URL. |
- Click Save.
- Click Push Configuration.
Configuring an SSID Captive Portal with Basic and Third Party Login Using Local Authentication
- Navigate to Configure > Access Point > Profiles.
- From the Profile list, click SSID under the Actions column of the Profile of the SSID you wish to edit.
- From the SSID list, click the SSID name of the SSID you wish to edit.
- In the SSID configuration window, click the Captive Portal tab.
- Select Sign-on with basic login page and third party credentials as the Splash page type.
- Select a third party sign-on page from the drop-down menu.
- [Optional] Click Splash page editor to open the splash page editor window. Refer to the Splash Pages section for more information.
- Select Local authentication as the Basic Login Page type.
- Select a local authentication database from the drop-down menu.
Note: Local authentication databases can be configured separately. Refer to Local Authentication for more information. - [Optional] Click Add authentication users to create a new local authentication database. Or select Local authentication list to view the Local authentication database.
- Specify the following information:
|
3rd party credentials |
Check to the box next to Facebook, Google, Weibo, Line and Twitter to enable logging in using respective account credentials. |
| Simultaneous Login |
Enable to allow the same account to be reused during multiple concurrent sessions. Note: Different authentication methods are unrelated regardless if using the same email or not. |
|
Session Timeout |
Enter a duration (in minutes) before the connection session automatically times out. The default is 120 minutes. |
|
Idle timeout |
Enter a duration (in minutes) of allowed inactivity before the captive portal page times out. The default is 30 minutes. |
| Session Limited | Enter the maximum amount of sessions limited (unlimited or 1-5). |
| Traffic Limited | [Optional] Specify how much data (MB/session) a client can transfer in a session. Enter 0 to not restrict the data amount. |
| Walled Garden | [Optional] Add a walled garden configuration to the captive portal. |
| URL Redirection | [Optional] If URL redirection is enabled, users will be redirected to the chosen URL after access to the SSID is granted. |
|
Redirection interval |
Enter the time (in minutes) clients will be periodically redirected to the URL. |
- Click Save.
- Click Push Configuration.
Configuring an SSID Captive Portal with Basic and Third Party Login Using a RADIUS or LDAP Server
- Navigate to Configure > Access Point > Profiles.
- From the Profile list, click SSID under the Actions column of the Profile of the SSID you wish to edit.
- From the SSID list, click the SSID name of the SSID you wish to edit.
- In the SSID configuration window, click the Captive Portal tab.
- Select Sign-on with basic login page and third party credentials as the Splash page type.
- Select a basic login page from the drop-down menu.
- [Optional] Click Splash page editor to open the splash page editor window. Refer to the Splash Pages section for more information.
- Select RADIUS or LDAP Server as the Basic Login Page type.
Note: Authentication servers can be configured separately. Refer to the Local Authentication section for more information.
- [Optional] If you have no pre-configured RADIUS or LDAP servers, click Add a RADIUS server or Add an LDAP server and specify the following information:
| Server Name | Enter a name for the server. |
|
IP Address |
Enter the IP address of the server. |
|
Port |
Enter a port for the server. The range is between 1 and 65535. (Default: 1812 for RADIUS server; 389 for LDAP server). |
| Base DN | Enter the domain for LDAP, for example, cn=admin, dc=mydomain, dc=local. |
| Encryption | [Optional] Select SSL or TLS or disable this option for LDAP. |
|
Secret |
Enter a shared secret for RADIUS. Note: Must be between 2-32 characters. |
| Authentication Method | [Optional] Select the Authentication Method. The options are PAP, MS-CHAP/MS-CHAPv2, EAP-MD5 or CHAP. |
| RADIUS Accounting | [Optional] Enable or disable the accounting mechanism. If enabled, enter the IP Address, Port number, Secret and Accounting Interim Interval in seconds. |
- Select a primary RADIUS/LDAP server database from the drop-down menu.
- [Optional] Select a secondary RADIUS/LDAP server database from the drop-down menu.
- Specify the following information:
|
3rd party credentials |
Check to the box next to Facebook, Google, Weibo, Line and Twitter to enable logging in using respective account credentials. |
| Simultaneous Login |
Enable to allow the same account to be reused during multiple concurrent sessions. Note: Different authentication methods are unrelated regardless if using the same email or not. |
|
Session Timeout |
Enter a duration (in minutes) before the connection session automatically times out. The default is 120 minutes. |
|
Idle timeout |
Enter a duration (in minutes) of allowed inactivity before the captive portal page times out. The default is 30 minutes. |
| Session Limited | Enter the maximum amount of sessions limited (unlimited or 1-5). |
| Traffic Limited | [Optional] Specify how much data (MB/session) a client can transfer in a session. Enter 0 to not restrict the data amount. |
| Walled Garden | [Optional] Add a walled garden configuration to the captive portal. |
| URL Redirection | [Optional] If URL redirection is enabled, users will be redirected to the chosen URL after access to the SSID is granted. |
|
Redirection interval |
Enter the time (in minutes) clients will be periodically redirected to the URL. |
- Click Save.
- Click Push Configuration.
Configuring an SSID Captive Portal with SMS Authentication
- Navigate to Configure > Access Point > Profiles.
- From the Profile list, click SSID under the Actions column of the Profile of the SSID you wish to edit.
- From the SSID list, click the SSID name of the SSID you wish to edit.
- In the SSID configuration window, click the Captive Portal tab.
- Select Sign-on with SMS Authentication as the splash page type.
- Select an SMS sign-on page from the drop-down menu.
- [Optional] Click Splash page editor to open the splash page editor window. Refer to the Splash Pages section for more information.
- Select an SMS configuration from the drop-down menu.
Note: SMS settings can be configured separately. Refer to the SMS Configuration section for more information.
- If you do not yet have an SMS configuration, click Add Twilio SMS Settings and add the following information:
| Name | Enter a name for the Twilio service profile. |
| Twilio Account SID | Enter your Twilio account SID. |
| Twilio Auth Token | Enter the authentication token for your Twilio account. |
| Twilio from Number | Enter the number of your Twilio account. |
Resend after (minutes) |
The elapse time for sending another SMS. Enter 0 to disable the limitation. |
| Maximum Resend (times) | The maximum number of times that an SMS can be resent. Enter 0 to restrict it to one time only. |
| Maximum Request (times) | The maximum number of times that an SMS for password purposes can be requested. Enter 0 to disable the restriction. |
| Denial Period | The amount of waiting time for another request after the Maximum Resend or Request limit has been reached. Enter 0 to disable the restriction. |
OTP Expires (minutes) |
The amount of time that a password sent through SMS is valid. |
| Allowed Phone Prefix | Country calling codes that are allowed to use SMS service for sending password. Use "," to separate code list, e.g. +886,+91. The default is "*" which means all country codes are allowed. |
- Specify the following information:
| Simultaneous Login |
Enable to allow the same account to be reused during multiple concurrent sessions. Note: Different authentication methods are unrelated regardless if using the same email or not. |
|
Session Timeout |
Enter a duration (in minutes) before the connection session automatically times out. The default is 120 minutes. |
|
Idle timeout |
Enter a duration (in minutes) of allowed inactivity before the captive portal page times out. The default is 30 minutes. |
| Traffic limited | [Optional] Specify how much data (MB/session) a client can transfer in a session. Enter 0 to disable the limitation. |
| Walled Garden | [Optional] Add a walled garden configuration to the captive portal. |
| URL Redirection | If URL redirection is enabled, users will be redirected to the chosen URL after access to the SSID is granted. |
|
Redirection interval |
Enter the time (in minutes) clients will be periodically redirected to the URL. |
- Click Save.
- Click Push Configuration.
Configuring an SSID Captive Portal with Email Authentication, SMS Authentication and Third Party Credentials
- Navigate to Configure > Access Point > Profiles.
- From the Profile list, click SSID under the Actions column of the Profile of the SSID you wish to edit.
- From the SSID list, click the SSID name of the SSID you wish to edit.
- In the SSID configuration window, click the Captive Portal tab.
- Select email authentication, SMS authentication and third party credentials as the Splash page type.
- [Optional] Click Splash page editor to open the splash page editor window. Refer to the Splash Pages section for more information.
- Select a Grace Period from the drop-down menu to define how much time users have for email verification before timing out. The default is 5 minutes.
- Select the amount of times a guest user can be authenticated on Wi-Fi in one day. The default time is 2.
- Enter a time limit for guest users to request another email authentication if they previously failed to connect and/or their grace period expired. The default is 30 minutes.
- Select an SMS configuration from the drop-down menu.
Note: SMS settings can be configured separately. Refer to the SMS Configuration section for more information.
- If you do not yet have an SMS configuration, click Add Twilio SMS Settings and add the following information:
| Name | Enter a name for the Twilio service profile. |
| Twilio Account SID | Enter your Twilio account SID. |
| Twilio Auth Token | Enter the authentication token for your Twilio account. |
| Twilio from Number | Enter the number of your Twilio account. |
Resend after (minutes) |
The elapse time for sending another SMS. Enter 0 to disable the limitation. |
| Maximum Resend (times) | The maximum number of times that an SMS can be resent. Enter 0 to restrict it to one time only. |
| Maximum Request (times) | The maximum number of times that an SMS for password purposes can be requested. Enter 0 to disable the restriction. |
| Denial Period | The amount of waiting time for another request after the Maximum Resend or Request limit has been reached. Enter 0 to disable the restriction. |
OTP Expires (minutes) |
The amount of time that a password sent through SMS is valid. |
| Allowed Phone Prefix | Country calling codes that are allowed to use SMS service for sending password. Use "," to separate code list, e.g. +886,+91. The default is "*" which means all country codes are allowed. |
- Specify the following information:
|
3rd party credentials |
Check to the box next to Facebook, Google, Weibo, Line and Twitter to enable logging in using respective account credentials. |
| Simultaneous Login |
[Optional] Enable to allow the same account to be reused during multiple concurrent sessions. Note: Different authentication methods are unrelated regardless if using the same email or not. |
|
Session Timeout |
Enter a duration (in minutes) before the connection session automatically times out. The default is 120 minutes. |
|
Idle timeout |
[Optional] Enter a duration (in minutes) of allowed inactivity before the captive portal page times out. The default is 30 minutes. |
| Session Limited | [Optional] Enter the maximum amount of sessions limited (unlimited or 1-5). |
| Traffic limited | [Optional] Specify how much data (MB/session) a client can transfer in a session. Enter 0 to not restrict the data amount. |
| Walled Garden | [Optional] Add a walled garden configuration to the captive portal. |
| URL Redirection | [Optional] If URL redirection is enabled, users will be redirected to the chosen URL after access to the SSID is granted. |
|
Redirection interval |
Enter the time (in minutes) clients will be periodically redirected to the URL. |
- Click Save.
- Click Push Configuration.
Configuring an SSID with an External Captive Portal
- Navigate to Configure > Access Point > Profiles.
- From the Profile list, click SSID under the Actions column of the Profile of the SSID you wish to edit.
- From the SSID list, click the SSID name of the SSID you wish to edit.
- In the SSID configuration window, click the Captive Portal tab.
- Select Sign-on with External Captive Portal as the Splash page type.
- Enter your custom external captive portal splash page URL.
- Enter the IP address for your primary RADIUS server.
- [Optional] Enter a secondary RADIUS server.
- [Optional] Enable or disable MAC authentication.
- Specify the following information:
|
Session Timeout |
Enter a duration (in minutes) before the connection session automatically times out. The default is 120 minutes. |
|
Idle timeout |
Enter a duration (in minutes) of allowed inactivity before the captive portal page times out. The default is 30 minutes. |
| Session Limited | Enter the maximum amount of sessions limited (unlimited or 1-5). |
| Walled Garden | [Optional] Add a walled garden configuration to the captive portal. |
- Click Save.
- Click Push Configuration.
Configuring an SSID with Facebook Wi-Fi
- Navigate to Configure > Access Point > Profiles.
- From the Profile list, click SSID under the Actions column of the Profile of the SSID you wish to edit.
- From the SSID list, click the SSID name of the SSID you wish to edit.
- In the SSID configuration window, click the Captive Portal tab.
- Select Sign-on with Facebook Wi-Fi to redirect users to visit a designated Facebook page and check in.
- Click Configure to configure your Facebook Wi-Fi settings.
- Click Save. If you want to delete a connected Facebook page, click Delete.
- Click Push Configuration.
Configuring SSID Access Control
Configuring SSID MAC Filtering Settings Using MAC ACL
Using MAC Access Control Lists (ACL), you can manage access to the network based on the MAC address of the connecting device. Clients with MAC addresses corresponding to MAC addresses in the ACL can be allowed or denied access to the network.
- Navigate to Configure > Access Point > Profiles.
- From the Profile list, click SSID under the Actions column of the Profile the SSID you wish to edit.
- From the SSID list, click the SSID name of the SSID you wish to edit.
- In the SSID configuration window, click Access Control.
- In the MAC Filtering section, click Enable.
- Select MAC ACLs as the Filter type.
- Choose a MAC ACL policy:
|
Allow |
Allow devices that correspond with a MAC address in the MAC ACL to connect to the SSID. |
|
Deny |
Prevent devices that correspond with a MAC address in the MAC ACL to connect to the SSID. |
- Select a MAC ACL from the drop-down menu.
Note: To create a MAC ACL, refer to MAC ACL for more information. - [Optional] Click Add a MAC ACL to create a new MAC ACL.
- Click Save.
- Click Push Configuration.
Configuring SSID MAC Filtering Settings Using RADIUS Authentication
You can configure an external 802.1x RADIUS server to authenticate users attempting to access the network.
Select a primary RADIUS server database from the drop-down menu.
- Navigate to Configure > Access Point > Profiles.
- From the Profile list, click SSID under the Actions column of the Profile the SSID you wish to edit.
- From the SSID list, click the SSID name of the SSID you wish to edit.
- In the SSID configuration window, click Access Control.
- In the MAC Filtering section, click Enable.
- Select RADIUS Server as the Filter type.
Note: Authentication servers can be configured separately. Refer to the Local Authentication section for more information.
- [Optional] If you have no pre-configured RADIUS servers, click Add a RADIUS server and specify the following information:
| Server Name | Enter a name for the RADIUS server. |
|
IP Address |
Enter the IP address of the RADIUS server. |
|
Port |
Enter a port for the RADIUS server. The range is between 1 and 65535 and default is 1812. |
|
Secret |
Enter a shared secret. Note: Must be between 2-32 characters. |
| Authentication Method | [Optional] Select the Authentication Method. The options are PAP, MS-CHAP/MS-CHAPv2, EAP-MD5 or CHAP. |
| RADIUS Accounting | [Optional] Enable or disable the accounting mechanism. If enabled, enter the IP Address, Port number, Secret and Accounting Interim Interval in seconds. |
- Select a primary RADIUS server database from the drop-down menu.
- [Optional] Select a secondary RADIUS server database from the drop-down menu.
- Click Save.
- Click Push Configuration.
Configuring SSID IP Filtering Settings Using IP ACL
Using IP Access Control Lists (ACL), you can manage access to external resources using the clients' IP addresses. Clients with IP addresses corresponding to IP addresses in the ACL can be allowed or denied access to IP addresses outside the current wireless network.
- Navigate to Configure > Access Point > Profiles.
- From the Profile list, click SSID under the Actions column of the Profile the SSID you wish to edit.
- From the SSID list, click the SSID name of the SSID you wish to edit.
- In the SSID configuration window, click Access Control.
- In the IP Filtering section, click Enable.
- Choose an IP ACL policy:
|
Allow |
Allow devices that correspond with an IP address in the IP ACL to connect to the SSID. |
|
Deny |
Prevent devices that correspond with an IP address in the IP ACL to connect to the SSID. |
- Select an IP ACL from the drop-down menu.
Note: To create an IP ACL, refer to the IP ACL section. - [Optional] Click Add an IP ACL to create a new IP ACL.
- Click Save.
- Click Push Configuration.
Configuring SSID Schedule Settings
- Navigate to Configure > Access Point > Profiles.
- From the Profile list, click SSID under the Actions column of the Profile of the SSID you wish to edit.
- From the SSID list, click the SSID name of the SSID you wish to edit.
- In the SSID configuration window, click the Scheduled Availability tab.
- Select a desired Schedule policy.
- [Optional] Click the 24 Hours or AM/PM tabs to change the time display format.
- To create a new Schedule Policy, click Schedule Policy. Click Add Schedule Policy and click the corresponding radio button to enable or disable the SSID during the selected day of the week. If Off is selected, the SSID will not be available for use that day.
- If On is selected, enter times in the From and To fields to define at what hours of the day the SSID will be available to connect to.
Note: To create a Schedule Policy, refer to Schedule Policies for more information.
- Click Save.
- Click Push Configuration.
Configuring Advanced SSID
- Navigate to Configure > Access Point > Profiles.
- From the Profile list, click SSID under the Actions column of the Profile of the SSID you wish to edit.
- From the SSID list, click the SSID name of the SSID you wish to edit.
- In the SSID configuration window, click the Advanced tab.
- Specify the following information:
|
Client Limit |
Enter the maximum number of concurrent clients that can connect to the SSID. The maximum is 64. |
|
Max Allowed Client Retries |
Enter the maximum amount of times a client can attempt to reconnect to the SSID once the maximum client limit has been reached. After retrying the set amount times, the client will associate with the AP for a maximum of up to 128 clients. Note: If set to 0, no additional clients will be accepted by the AP despite the amount of retries. |
|
Max Upstream |
Enter a maximum uploading bandwidth limit (in Kbps) for this SSID. |
|
Max Downstream |
Enter a maximum downloading bandwidth limit (in Kbps) for this SSID. |
|
Max Client Upstream |
Enter a maximum uploading bandwidth limit (in Kbps) for each client connected to this SSID. |
|
Max Client Downstream |
Enter a maximum downloading bandwidth limit (in Kbps) for each client connected to this SSID. |
|
Forward Bonjour Pkts |
Enable or disable the forwarding of Apple Bonjour packets from wireless clients to the rest of the network. |
|
IGMP Snooping |
Enable or disable IGMP Snooping. This allows the SSID to listen in on IGMP conversations on the network. |
|
Max Multicast Ingress |
Enter a maximum multicast ingress bandwidth limit (in Kbps). |
|
RTS Threshold |
Enter the packet size threshold to determine when the device will issue a RTS before sending the packet. |
|
Force Roaming |
Enable or disable force roaming. Clients will be forced to roam to another access point once the signal strength falls below the set threshold. |
|
Signal Strength Threshold |
Enter the signal strength threshold (in dbm) for clients to start roaming. |
|
Weak Signal Exception |
Enable or disable weak signal exception. This allows clients with a weak signal to connect to the SSID after a set number of attempts. |
|
Weak RSSI Client Associations Attempts |
Enter the number of times a client with a weak signal can try to connect, after which the access point will allow the client to connect to it. |
- Click Save.
- Click Push Configuration.
Deleting an SSID
- Navigate to Configure > Access Point > Profiles.
- From the Profile list, click SSID under the Actions column of the Profile the SSID you wish to delete belongs to.
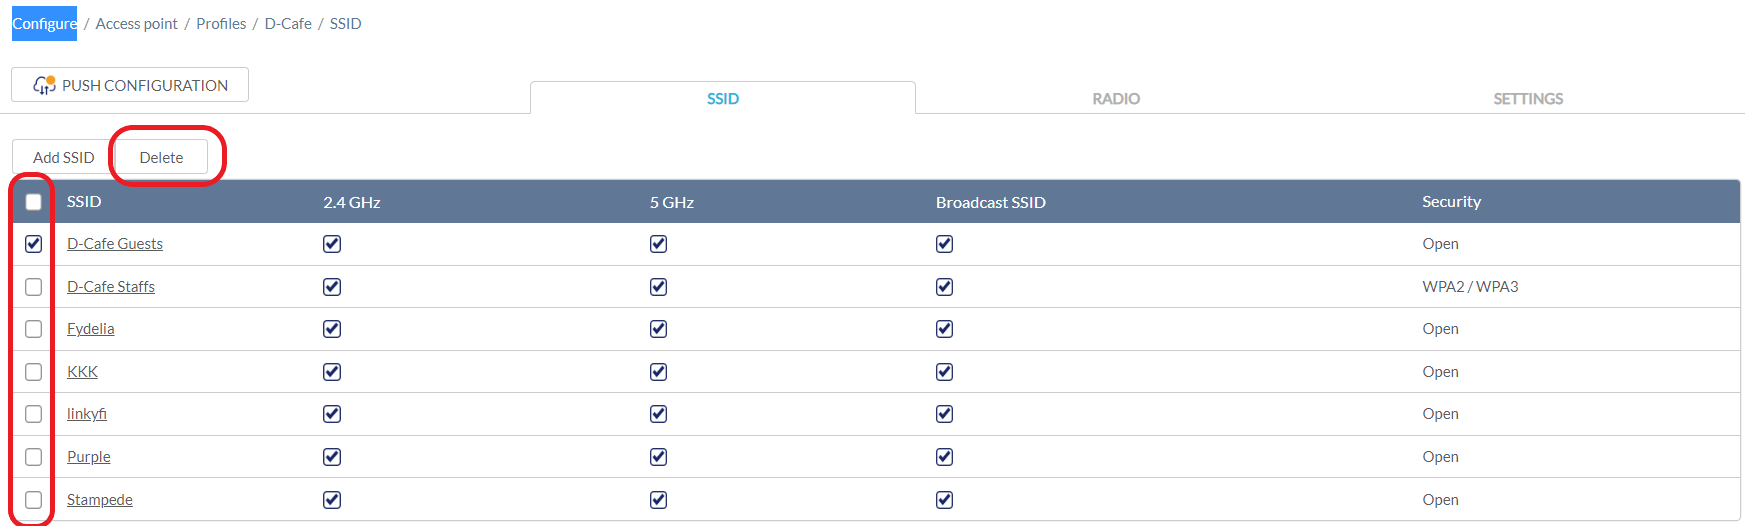
- From the SSID list, click the checkbox next to the SSIDs you wish to delete.
- Click Delete.
- When prompted to confirm, click Yes.
Configuring Profile Radio
From the Radio window, you can configure the 2.4 GHz and 5 GHz wireless bands settings including basic radio functionality, channel selection, and advanced settings and troubleshooting features.
Configuring Basic Profile Radio Settings
- Navigate to Configure > Access Point > Profiles.
- From the Profile list, click RADIO under the Actions column of the Profile you wish to edit radio settings for.
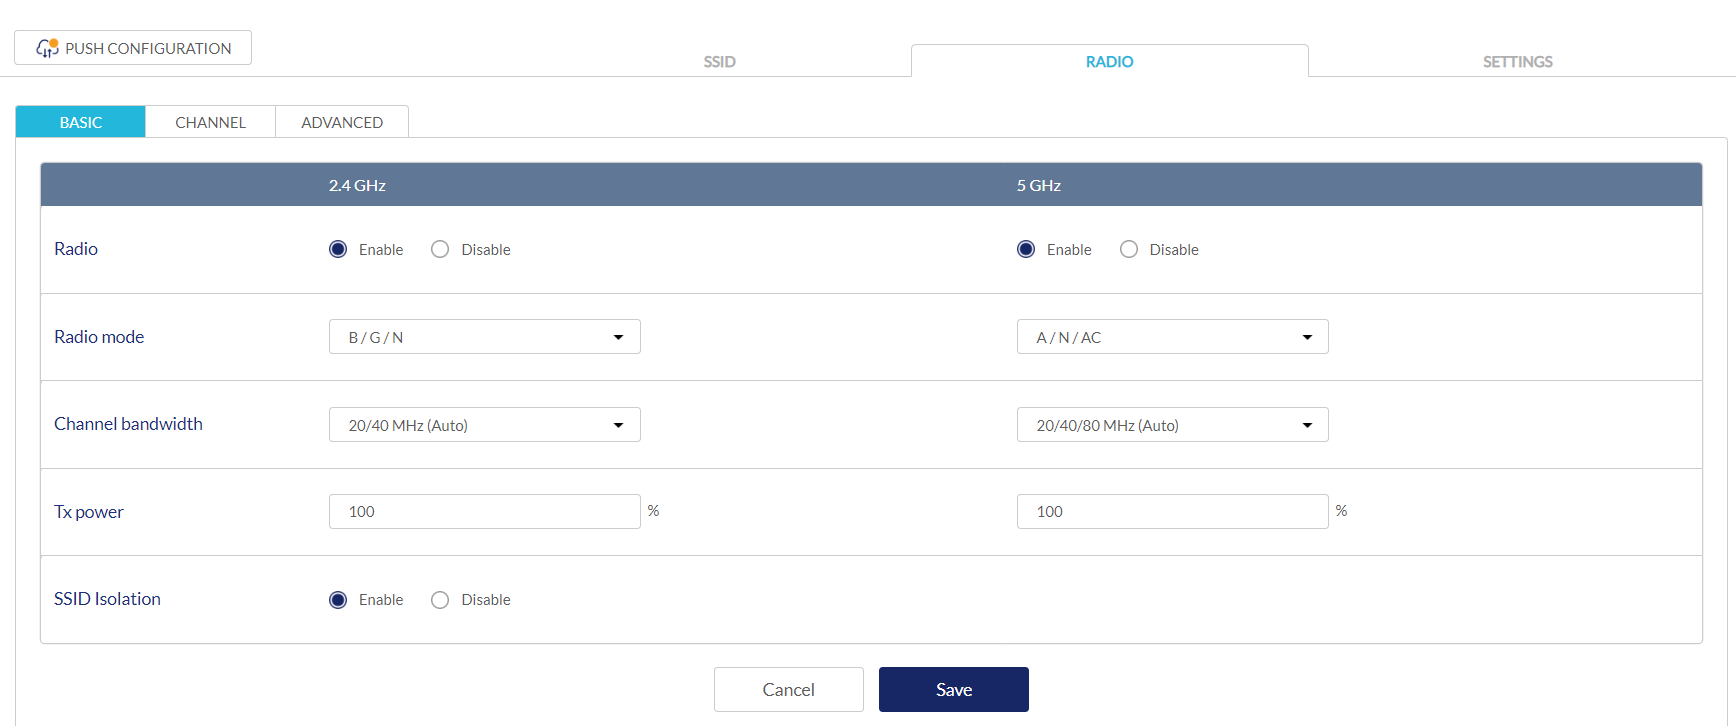
- Click the Basic tab.
- Specify the following information:
Note: The settings below apply to both the 2.4 GHz and 5 GHz bands.
|
Enabled radio |
Choose to enable or disable the 2.4 GHz and 5 GHz wireless band. |
|
Radio Mode |
Select a radio mode from the drop-down menu. Only devices that support the selected wireless standards will be able to connect to this wireless band. |
|
Channel Bandwidth |
Select the channel transmission bandwidth for the 2.4 and 5 GHz wireless frequencies from the drop-down menu. |
|
Tx power |
Enter the maximum transmission power (in %) for the 2.4 GHz and 5 GHz wireless bands. |
|
Choose to enable or disable station isolation. |
- Click Save.
- Click Push Configuration.
Configuring Profile Radio Channel Settings
- Navigate to Configure > Access Point > Profiles.
- From the Profile list, click RADIO under the Actions column of the Profile you wish to edit radio settings for.
- Select the Channel tab.
- Specify the following information:
Note: The settings below apply to both the 2.4 GHz and 5 GHz bands.
|
Choose to enable or disable to automatically scan and assign devices. |
|
|
Channel |
If Auto channel is disabled, select a wireless channel from the drop-down menu. |
|
Eligible channels |
Click on a channel number to enable (dark blue) or disable (white) the channel. The SSID will only broadcast on the enabled channels. Note: The available channels may vary based on the country of operation. |
|
Force auto channel scan |
Choose to enable or disable the auto channel scan to be forced. Forcing the scan is more accurate, but wireless clients may be disconnected during the scan. |
|
Auto channel interval |
Specify the interval (in hours) at which the auto-channel scan is performed. |
- [Optional] Click Run Auto Channel now to manually perform an auto-channel scan.
- Click Save.
- Click Push Configuration.
Configuring Advanced Profile Radio
- Navigate to Configure > Access Point > Profiles.
- From the Profile list, click RADIO under the Actions column of the Profile you wish to edit radio settings for.
- Click the Advanced tab.
- Specify the following information:
Note: The settings below apply to both the 2.4 GHz and 5 GHz bands.
|
Multicast rate |
Select the multi-cast rate for the 2.4 GHz and 5 GHz wireless bands from the drop-down menu. This value determines the minimal signal quality for connection. A lower rate allows longer, weaker signals to connect. A higher rate only allows shorter, stronger signals to connect. |
|
Beacon interval |
Enter a beacon interval value (in ms) between 40 and 3500. This determines the delay in ms between each information beacon broadcasted by the AP. |
|
DTIM interval |
Enter a DTIM interval value between 1 and 255. This determines the delay between each Delivery Traffic Indication Map (DTIM). The value represents the number of beacons sent before a DTIM is sent. |
|
Choose to enable or disable Unscheduled Automatic Power Save Delivery (UAPSD). This feature allows connected clients to save power. |
|
|
Short guard interval |
Choose to enable or disable Short Guard Interval. This reduces signal loss from the multipath effect where multiple signals reach the receiving antenna at different times. |
- Click Save.
- Click Push Configuration.
Configuring General Profile
From the General Profile settings, you can configure a proxy server to route traffic and enable IPv6 support.
- Navigate to Configure > Access Point > Profiles.
- From the Profile list, click Settings under the Actions column of the Profile you wish to edit general settings for.
- Specify the following information:
|
Choose to enable or disable proxy server functionality. |
|
|
Proxy Host |
If proxy server is enabled, enter the proxy server host address. |
|
Proxy Port |
If proxy server is enabled, enter the proxy server port. The range is between 1 and 65535. |
|
IPv6 |
Choose to enable or disable IPv6 support. This allows the Profile to work in an IPv6 network environment. |
| Fast Roaming | Chose to enable or disable the Fast Roaming feature. Note: This feature cannot be enabled for SSIDs which enable NAT mode or WPA3 security. |
| Management VLAN |
Enable or disable the Management VLAN function. If enabled, enter the VLAN tag for the Management VLAN. Once it is enabled, make sure that the device administering the wireless network is a member of this VLAN. Note that the management VLAN setting applies to the SSID when NAT mode is enabled. Go to the Basic tab for the NAT mode setting. |
- Click Save.
- Click Push Configuration.
Pushing Configuration Changes
The Push Configuration function allows users to quickly apply Profile configuration changes to all devices using this Profile.
Note: Any time a change is made to the Profile settings, the changes need to be pushed to all associated devices in order to apply these changes.
- Navigate to Configure > Access Point > Profiles.
- Check the profiles that you wish to update the configuration settings from the list.
- Click Push Configuration at the top.
- You can choose to Push the Configuration now or Schedule the push at a later time.
- Click Schedule Changes.
Note: A result window will appear providing a summary of the update status. The Status column will also reflect the status of the profile configuration changes.